Subtle Mends for Unmentionable Areas

I teach workshops on visible mending regularly, and by far, the most requested mend is the dreaded crotch repair. Luckily, it's a pretty simple repair.
If you are like me, jeans are my favorite article of clothing to wear. And a well fitting pair of jeans is magic, and also tragic when they are in need of repair. And it seems that the upper thigh/crotch area is the first to go.
Why is this always happening?
Well, first of all, your nether regions themselves are not creating these rips in your denim. Particularly if your jeans are a blend, they are not made to last. Does 98% cotton sound familiar? That measly sounding 2% has the power to make jeans about as durable as a sheet of paper, and the upper thigh area, is the most vulnerable. This is fast fashion and it drives me nuts, but that diatribe is for another time, let's talk about how to patch this recurring nightmare.
When is the best time to repair?
The best time to repair is when you notice the denim becoming so thin you can see the light shows through the denim. And sometimes, if you've put it off for so long, an actual hole begins to form. That's okay, it's not too late, just a bigger repair job.
By machine or by hand?
Either way. This are of your jeans is invisible when you are wearing them. The machine method is less visible, but no more durable for this particular area. I decided to use an extreme version, my own very favorite pair of jeans, that should have been properly repaired months ago.
Prepping the area

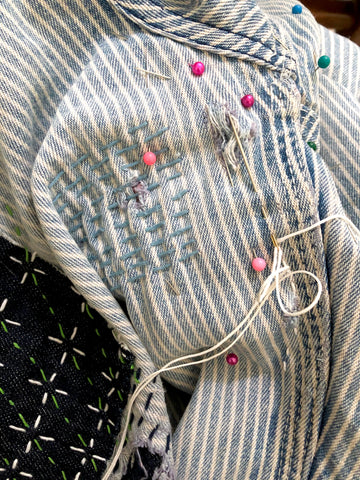
Whether you decide to repair with visible hand mending, or using a sewing machine, the prep is the same. Find a scrap of denim that is a close match to the existing denim. I used a thicker, 100% denim cotton scrap for good measure.
Pin the patch under the weakened area on the inside of the denim.
Machine Mending
Using a sewing machine to mend the upper thigh is relatively simple. I used denim thread, because it blends so well. I also made sure to use a heavier needle designed for sewing denim. Now, using a regular stitch, sew with the weave of the denim, forward and reverse, altering your path slightly, but making sure to continue in the direction of the lines in the denim.

Do this until the area seems secure, but not too long, or the area will become very stiff, and possibly uncomfortable to wear. Remember, you can easily add more stitching, but subtracting is not so easy.

Here's the side by side comparison of hand mending vs. machine mending upper thigh areas. A hand mending tutorial follows.
Step-by-Step Hand Mending

Above is the crotch area of a pair of overalls. You can see the weakened material on each of the 4 areas where the seams come together. You will want to patch each of these areas separately, cutting patches to fit neatly into place.

Now pin everything into place, and stitch from the inside of the jeans out. It's helpful to keep one hand on the underside of the mend so that you can make sure the patches don't fold or crease while you are stitching.
Complete stitching one section at a time. I don't encourage overlapping the patches over the seam. It can limit the movement of your jeans. Stitching into the seam will add strength to your mend.
You will want to take care to use small stitches in this area, and make sure the thread tension doesn't get too tight, or your patches may start to pucker.
Here's a look at the inside of the mend. You can always trim up patches when you are finished.

And the finished underside that only you will see!

Mending Supplies:
Thanks so much for the tutorial! My favorite pair of jeans have holes the size of the palm of my hand in the crotch area :(( I only just got fabric that would match the pants and I’ve started the mending process
Thank you so much for this tutorial! I am going to use the fabric at the end of the pants legs that I have to roll for mending the pants :D
Dropping a line to say that I used this tutorial (alongside a kit I just bought from your Etsy store) to repair my absolutely beloved 99% cotton jeans. One part of the crotch had juuuuuuuust gone from thin to “that’s daylight” and I was able to make the area nice and secure one more—by hand! I’m almost looking forward to more opportunities to mend clothes now.
And worse, the quality of construction! There are some brands I refuse to purchase anymore simply because there is NO seam allowance~ the jeans look great before wearing and then… the seams unravel. I have gone as far as to basically remake the jeans seam by seam. But we all know it is the fault of spandex…living for the day when 100% cotton jeans are back on the market. Nothing like a well worn pair of 100% cotton jeans!!!!
Thank you SO much for addressing this.
I completely agree with the cotton/spandex ruination of jeans. Skinny jeans (or cotton/spandex leggings as I call them) are everywhere, and even jeans that have straight legs are made of cotton/spandex blend.
When you have actual thighs, the material in this area doesn’t last, which means you have to replace them.
Which I think is the point of them: to keep one buying them.
Anyway, thanks for having this tutorial!!